- Unload Plugins for Faster Load Times

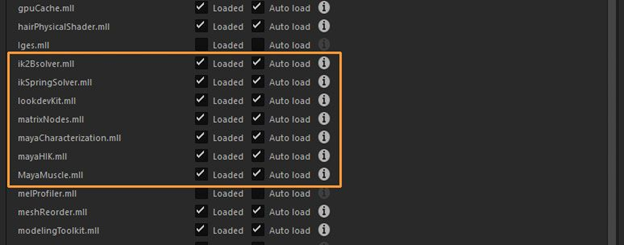
Maya offers a wealth of features, but as the number of plugins and tools increases, so does the loading time. In the fast-paced world of 3D, every second truly counts. To streamline your startup process, go to Windows > Settings & Preferences > Plug-in Manager. Here, you’ll find options to load, unload, or auto-load various plugins.
Unloading unnecessary plugins can significantly reduce Maya’s boot time. For example, if you primarily focus on modeling, you can safely unload advanced rigging options and FX-heavy plugins like Bifrost.
2. Use Soft Selection Options

Soft Selection, accessible via the ‘B’ hotkey, is a widely used modeling feature. While it works well by default, delving into the Tool Options unlocks greater control. For example, changing the Falloff mode from Volume to Surface allows for more precise adjustments in areas like eyes and lips (see image).
If your model consists of separate parts, setting the Falloff mode to Global will extend the falloff to the entire model. You can also fine-tune your selection using Radius and Curve Falloff, which is particularly useful when creating facial shapes.
3. Try the Relax Brush

Recent Maya versions integrate sculpting tools from Mudbox. However, some users still prefer Mudbox’s immediacy and performance. That’s where the Sculpt Geometry Tool comes into play.
Located in Surfaces > Sculpt Geometry Tool, this tool offers a set of practical brushes. The Relax Brush emerges as a standout, serving as an excellent method for maintaining uniform faces during modeling while also removing details without sacrificing the form, a common issue when using the Smooth option.
4. Improve Viewport Speed with Backface Culling

Each new release of Maya brings improvements in handling large datasets. However, viewport lag can still occur. A simple solution is enabling the Backface Culling option, found under Shading > Backface Culling. This prevents the viewport from rendering faces that are not currently facing the scene camera.
To observe the impact, go to Display > Heads Up Display and enable Frame Rate. Toggle Backface Culling on and off to witness the viewport speed improvement.
5. Edit Edge Flow

The Edit Edge Flow feature proves to be a valuable addition to Maya’s modeling toolkit. It allows for intelligently and quickly averaging out an inserted edge loop, conforming it to the existing model’s form. This eliminates the need for manual editing, resulting in faster and more accurate modeling.
This is ideal for creating clean and accurate meshes. You can access it via Edit Mesh > Edit Edge Flow. Alternatively, when an edge loop is selected, hold Shift and right-click to open a marking menu with the command at the bottom.
6. Create a Custom UI

Customize marking menus and hotkeys for streamlined workflow and easy tool access. Organize Maya Shelves to fit your preferences and add any necessary tools. This method helps you quickly access commands from the menus on the shelves. Even create new icons for tools, personalizing Maya to your liking.
7. Create a Custom UI
Use the camera rig for seamless animation and motion in your scenes. This is the best way to control the camera in 3D scenes. You can rig any type of camera, with so many options for controlling it available.
8. Use Low-Poly for Speedy Retopology

Try this tip for speedy Retopology. Import your high-poly model then create a low-poly primitive object that resembles the high poly. Edit and resize the low-poly object UVs to make them like the high-poly model, then delete the history and freeze transform the low-poly object.
Select the high-poly then low-poly mesh and go to: Mesh > Transfer Attributes. Finally, edit Transfer Attributes as seen in the screenshot.
9. Create a Low-Poly Tree

To begin, create a circle and some curves, then extrude the circle along the curves and deform it. Create UVs for the trunk. Create a low-poly plan and assign some branch textures with alphas set to transparency. Then, make the tree trunk live and add branches.
10. Tackle Complex Shapes

To work with complex shapes, start with a plan and 10 subdivisions in both width and height. Select the inner edge and navigate to Create > Sets > Quick Select Set. Then, select all faces, and navigate to Edit Mesh > Poke. Go to Select > Quick Select Set > Set, and delete edges. Finally, delete the selected face.
11. Organize Your Files Properly
Maya uses a folder structure to organize project files, keeping all project-associated files in one directory. When opening a scene linked to a Maya project, especially when switching between projects, first set the project folder before opening the scene file.
Simplify project setup by opening Maya, then selecting File > Open Scene. In the Open window, click Set Project to open the Set Project window. Select the project directory, click the Set button, then from the Open window after the Set Project window closes, open the scene file.
12. Set up a Maya Project Directory

Maya keeps track of all files associated with a scene in a dedicated project directory. While working with a single file without a project directory is possible in some situations, any associated files with the scene should be contained within a Maya project directory. With the project directory set, Maya searches the scene’s directory for all scene files—Maya ASCII or Maya Binary files.
Image files, used as textures in the sourceimages folder, are automatically located when the scene file opens. Rendered images and generated maps are stored and saved in the images directory.
13. Use Resolution Gate to Compose Final Render
Activate the Resolution Gate to display a guide within the main viewport that represents the area of your final render. Displayed as a framed area in the main viewport, the Resolution Gate ensures your camera framing matches the final rendered image. The rendering resolution height and width are displayed in the masked area above the Resolution Gate in the viewport when the resolution gate is active. Also, the camera’s name is displayed in the masked portion below the gate mask. The resolution settings are set in the Image Size section of the Render Settings window.
14. Use Hotkeys to Set Animation Keyframes
You can set a keyframe on an object, camera, or light by selecting it and pressing S on your keyboard. This applies a keyframe to the selection at the current timeline frame for the attributes displayed in the Channel Box. Typically, the current position, rotation, scale, and visibility are available. You can key specific attributes by selecting the channels, right-clicking on any labels in the Channel Box, and then choosing Key Selected from the menu.
15. Create a Shot Camera for Animation
When Maya opens a new scene, several default cameras are set up. The default perspective view allows you to look around the scene, named Persp. While the default camera is useful for final renderings, it’s not ideal for animating with camera movements that require keyframes on the camera. Using keyframed cameras will return to keyframe locations when scrubbing on the timeline. You should add a new camera for rendering and keyframing by going to Create > Cameras > Camera.
16. Make Ornaments with Flow Path Object

For repeatable elements such as ornaments or stitch patterns, use Attach to Motion Path and Flow Path Object in Maya. These are extremely useful for scattering many intricate objects across complex surfaces.
17. Create Natural Hair with Xgen

With a few guide curves and XGen modifiers, you can make beautiful hair. Start by creating hair from guide curves with XGen. Create a clumping modifier to bundle large hair sections, a second clumping modifier for medium bundles, and a third for small bundles. Making a cut modifier will help you achieve the natural tips for the hair. Finally, add a noise modifier for a natural stream and frizz.
18. Use Procedural Nodes for Face Textures

Easily create and reuse face textures using procedural nodes, which also allows for beautiful gradations. First build the shader tree before blending textures using a layered texture node. Adjust the Alpha amount to find the best look. Connect the layered texture to SubSurface Color, and then alter the skin shader for the desired image.
19. Use Guide Curves for Stylised Hair

This suggestion is useful for creating guide curves for a character’s stylised hair. Create the base hair and ensure there are holes at both ends to extract the curve from the mesh. Then set up some joints and easily deform the shape using a spline IK handle, and then apply the skin using them. Apply scatter hair objects on the head with a spline IK handle. Then extract curves from the mesh.
Lastly, you must arrange the directions, choose the opposite direction’s curve, and select Curves > Reverse Direction. This method allows you to craft guide curves during the design process.
20. Try Cryptomatte for Look Development

Cryptomatte, created by Psyop, is an ID matte creation tool that automatically generates ID mattes for look development and final adjustments. After installation, construct the Cryptomatte AOVs in Render Settings. Choose an AOV and view it in the Attribute editor. This should be visible in the Shader under Custom AOV. You can export three ID mattes that follow demand object, material, and asset. Consider using the ID mattes for significant adjustments in Photoshop or Nuke, helping to find a fresh look when stuck on an image. This is especially useful during tight deadlines when you urgently need a fresh look.