Houdini offers powerful tools for simulating fluids. However, making fluids look realistic, especially for broadcast work, always presents a challenge.
Let’s delve into some techniques from FuseFX artist Kevin Pinga to create faster, more flexible FLIP fluid simulations.
1. Source Fluids with POP Source, Not FLIP Source

The standard method for sourcing fluid in FLIP involves using a FLIP Source node. This creates a VDB that the Volume Source node in DOPs reads. While effective for large, undefined shapes, this method can consume significant resources and time before reaching the simulation phase.
Instead, consider using regular polygon-based SOP geometry directly, without converting to VDBs. This source can be read by the POP Source node, connected to the Sourcing input of the FLIP solver itself, similar to sourcing a regular particle simulation.
This approach utilizes a more intuitive workflow, as you’re likely familiar with the controls on the POP Source node from working with regular particles. You can easily control and monitor particles independently of the Particle Separation of the FLIP object.
2. Leverage POP Nodes with FLIP Fluids

FLIP essentially consists of a series of POPs with volumetric advection steps interspersed. Since the foundation is particles, all POP nodes in DOPs are compatible with FLIP fluids. This compatibility explains why we could use the POP Source node in the previous tip.
The POP Force node is a key tool for creating interesting motion in regular particle simulations. It works similarly with FLIP fluids. Even a small amount of noise introduced with this node can significantly enhance the visual appeal of the fluid. Low-frequency noises are also effective at adding detail without excessive particle count or particle separation. (Exercise caution to avoid overusing noise, as it can lead to unrealistic simulations.)
Another beneficial POP node for FLIP simulations is POP Speed Limit. Paired with a POP Drag node, it’s excellent for managing high-velocity particles that might otherwise become uncontrolled.
3. Utilize Bounds qL to Define Your FLIP Limits

The Bounds qL node is a valuable tool packed with several simple features. It’s part of a larger open-source Houdini toolset called qLib, often included in studio installations. If it’s not in your personal environment, you can install it by following the instructions on GitHub.
Kevin Pinga uses Bounds qL mainly for setting volume limits in FLIP and Pyro simulations. It improves upon the standard Bound node by offering an option to create bounds based on an animated input.
The most useful feature is the Output: Values checkbox, which reveals the size and center values of the bounding box. These values can be copied to any parameter within the FLIP solver’s Volume Limits tab, or any other operations that require a bounding box. Centralizing the bounding box information prevents user errors and aids in creating more procedural setups.
4. Enable Useful Attributes in the FLIP Solver

Within the FLIP solver, you should enable three key parameters in your FLIP simulations: ID, age, and vorticity. These parameters facilitate post-simulation adjustments and are accessible within the FLIP Solver under the Behavior and Vorticity tabs.
Most artists are familiar with the ID attribute and its power. While caching an additional attribute may slightly increase your data size, retaining this information is generally a good practice.
You can regulate the visual progression of a sim by enabling the age attribute via the Age Particles checkbox (which also exports life attribute). This is particularly useful if your source continuously emits.
The vorticity attribute is valuable for generating secondary simulations, like whitewater, and is also well-suited for shader manipulation.
5. Post-Simulation Tweaks to Rescue Failing Simulations

There’s a tendency to rely on the output of a FLIP simulation as the final result. Although this is an ideal approach, time constraints may not always allow for resimulation to fix issues. In these situations, running post-simulation tweaks on the FLIP particles can “salvage” the sim.
Also, incorporate the ID attribute so you can use the Retime node to adjust the timing of the simulation.
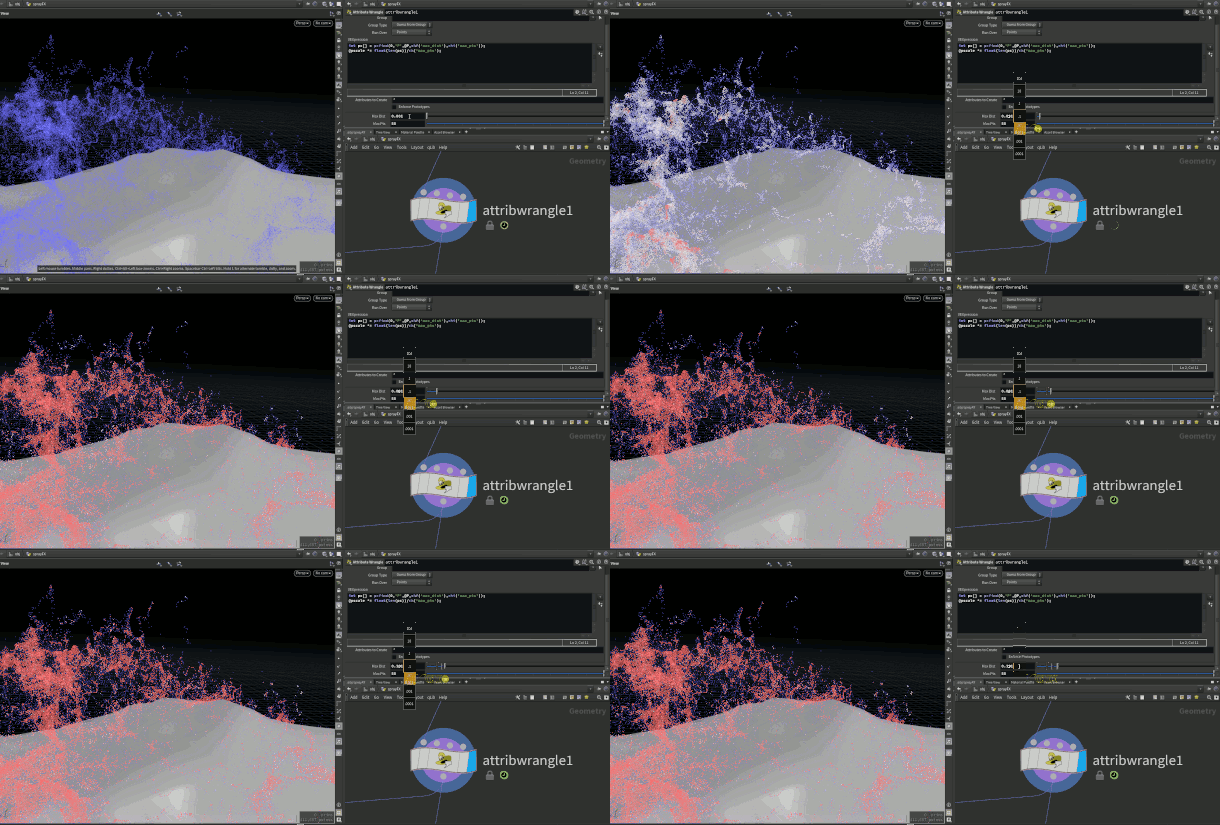
Pinga highlights another challenge often encountered when running mid-resolution simulations: Liquid droplet sizes appear correct in high-density areas but are too large in sparser areas. In such cases, a simple wrangle using the pcfind: function can help to mark sparse areas and reduce their pscale values.
Below is the code snippet:
int pc[] = pcfind(0,’P’,@P,chf(‘max_dist’),chi(‘max_pts’));
@pscale *= float(len(pc))/ch(‘max_pts’);
6. Implement xyzdist to Handle High-Resolution Collision Surfaces

This is another post-simulation tweak. Together with primuv(), xyzdist() is highly useful.
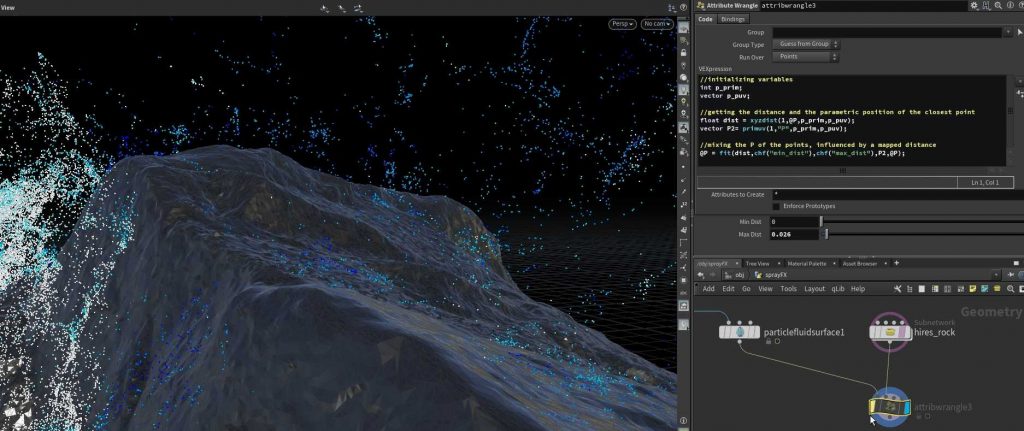
Within a VEX or VOPs context, xyzdist() calculates the distance to the nearest interpolated point on a surface. When used with primuv(), you can extract any attribute from the parametric UVs of the object!
In the above example, we extract the position of the high-resolution collision surface and use it to push particles toward the surface. This can also be applied directly to the meshed surface, especially in shots where the collision surface is transparent (e.g., pouring liquid into a clear glass). Clamping the distance to a very small value will help to speed up calculations.
Here’s the code snippet:
//initializing variables
int p_prim;
vector p_puv;
//getting the distance and the parametric position of the closest point
float dist = xyzdist(1,@P,p_prim,p_puv);
vector P2= primuv(1,”P”,p_prim,p_puv);
//mixing the P of the points, influenced by a mapped distance
@P = fit(dist,chf(“min_dist”),chf(“max_dist”),P2,@P);
In production, it’s more practical to use a lower-resolution collider during simulation and then run this function in a post-simulation wrangle to make the fluid interact with a high-resolution collider.
7. Remove Problematic Particles Using ID

This is a straightforward but effective trick for simulations that are nearly complete, with just a small percentage of particles not functioning as expected. If you stored the previously mentioned ID attribute, you can use it to eliminate the troublesome particles. Without ID, marking the appropriate particles for deletion becomes impossible, as the point count changes from frame to frame.
To troubleshoot, enter point selection mode and press [9] on your numpad. This opens the Group Selection pane. To select by ID, click the gear icon and select Attributes > id. Then select the particles in the viewport that you want to remove and press [Delete]. A Blast node will be automatically created, referencing the point ID instead of the point number.
8. Use Reseeding to Enhance Sparse Regions

Problems arise in production when the final render doesn’t appear correct, the result of insufficient particles, a consequence of using a mid-resolution FLIP sim.
In such cases, you should increase the reseeding parameters, rather than altering your particle separation. Reseeding is enabled by default, but increasing the Surface Oversampling parameter can increase the particle count in sparse areas by spreading out the particles. This lets you preserve the overall simulation look while ensuring sufficient particles to avoid an incorrect-looking meshed fluid.
9. Leverage the Original FLIP Sim Directly as a Distinct Element

The traditional approach to creating whitewater involves simulating the FLIP fluid and then running the Whitewater solver on top of that. However, for fast-moving fluids such as splashes and water jets (think a broken fire hydrant or underwater in a hot tub), the second step isn’t always necessary. Additionally, meshing the particles can make it tricky for the fluid to look right.
Instead, take the FLIP sim itself and render it directly with a whitewater shader. You can render the particles themselves or rasterize them to a VDB and render the result as a volume.
10. Optimize the Simulation and Caches

A major challenge with high-resolution FLIP sims is managing the substantial amounts of data they generate. A common practice is to delete all the unnecessary attributes before caching any part of a simulation.
Another useful tip involves culling the particles outside the camera’s frustum to reduce the memory footprint. Also, for geometry ready to be rendered, it’s best to cache it and enable the Delay Load Geometry checkbox. Instead of having Mantra embed the geometry in the IFD file, it will reference the file on disk. This improves loading times and significantly reduces IFD generation times and file size.
Conclusion
These are some of Kevin Pinga’s techniques for simulating fluids using Houdini’s FLIP solver. These tips and tricks can help you more efficiently manage your fluid simulations when delivering fluid shots in a timely manner while still maintaining high quality.
See Also:
- Maya 2022.2 Released With Bifrost And USD Improvements
- Maxon Updates Cinema 4D, Redshift, Trapcode And More
- Unity ArtEngine 2021.10 Released With A Price Reduction
